
更新
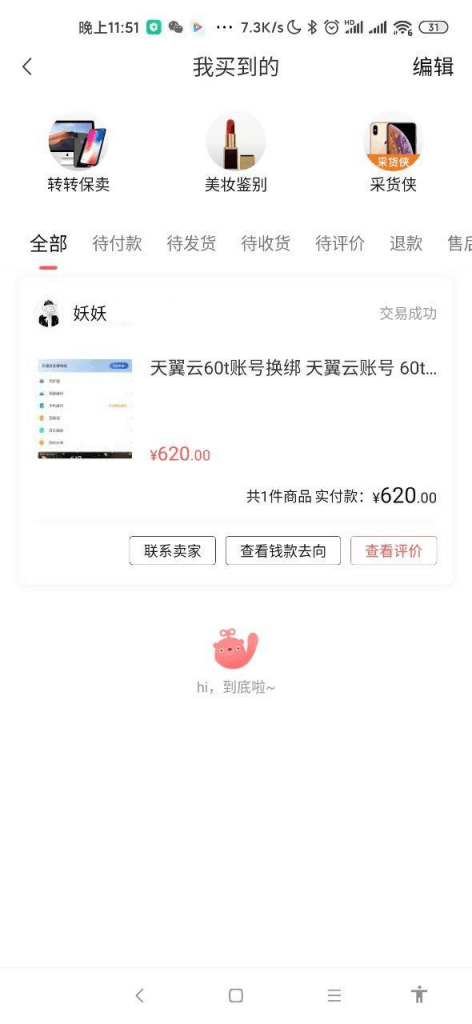
我前天又搞了一个真正的珍品传家宝 60T。这次我感觉天翼云开始靠谱了。
我是第一次见到60T,马上下手了。


安装
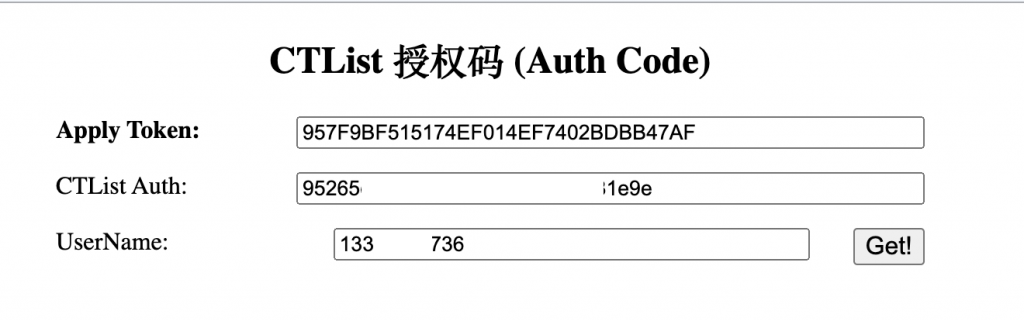
所有要一个申请码(Apply Token)(我是去了这个群里,直接厚脸皮和大佬要的 – https://t.me/MoeClub_SHOP)
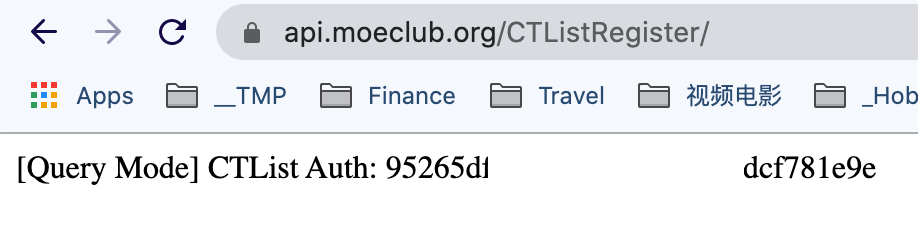
然后去 https://api.moeclub.org/CTListRegister/ 用”Apply Token” + UserName 生成一个AuthCode(“95265….”).

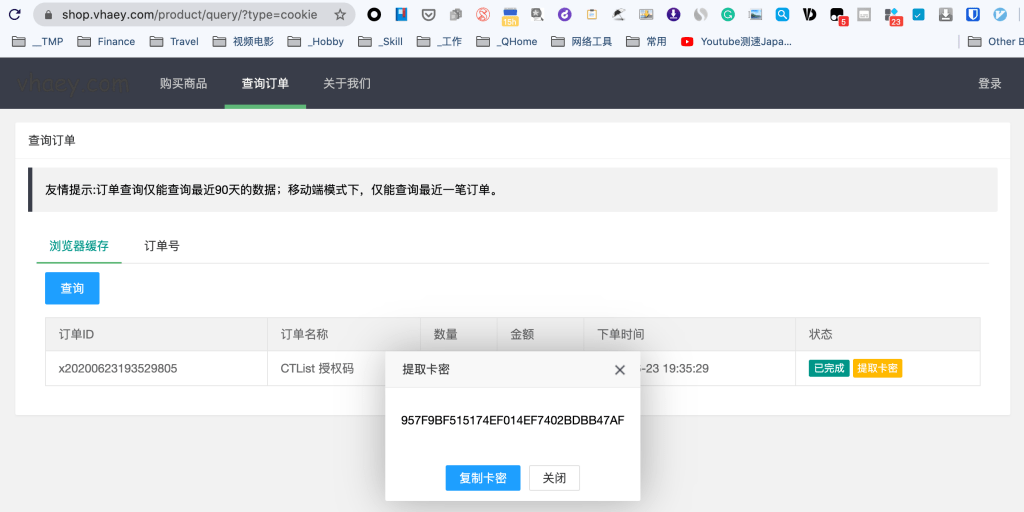
由于我需要绑定两个盘,那我就去申请页面上把新买的(这里买的 )Apply Token加到已有的AuthCode (“95265…”),并绑上新账号的电话。
使用
安装和配置
cd ~
git clone https://github.com/lava-lake/CTList
cd CTList
# 这个主题更好用 - 和Onelist通用
# https://github.com/MoeClub/OneList/tree/master/Rewrite/%40Theme/HaorWu
wget --no-check-certificate https://raw.githubusercontent.com/MoeClub/OneList/master/Rewrite/@Theme/HaorWu/index.html
# 修改配置文件
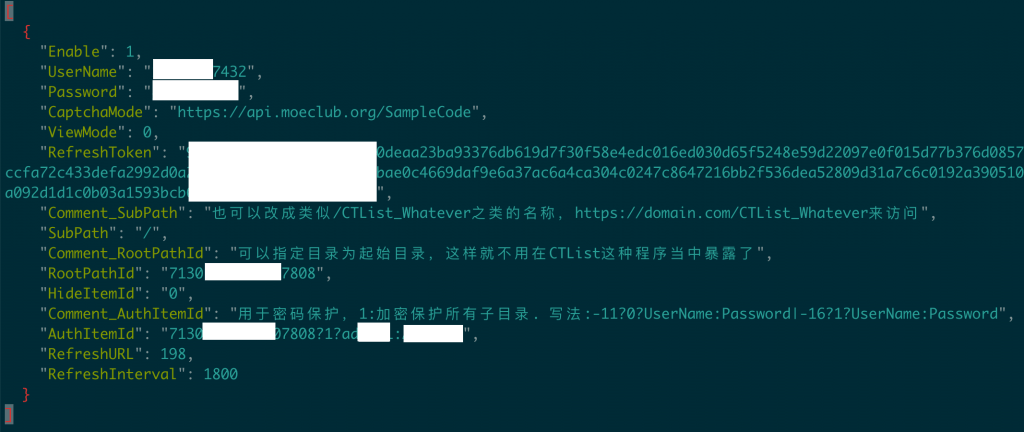
vi config.json[
{
"Enable": 1,
"UserName": "纯电话号码",
"Password": "登录密码",
"CaptchaMode": "https://api.moeclub.org/SampleCode",
"ViewMode": 0,
"RefreshToken": "",
"Comment_SubPath": "也可以改成类似/CTList_Whatever之类的名称,https://domain.com/CTList_Whatever来访问",
"SubPath": "/",
"Comment_RootPathId": "可以指定目录为起始目录,这样就不用在CTList这种程序当中暴露了",
"RootPathId": "71301-或者-11代表根目录-7808",
"HideItemId": "0",
"Comment_AuthItemId": "用于密码保护,1:加密保护所有子目录. 写法:-11?0?UserName:Password|-16?1?UserName:Password",
"AuthItemId": "71301-或者-11代表根目录-7808?1?admin1:Admin1!",
"RefreshURL": 198,
"RefreshInterval": 1800
}
]主要改前4项,其他可以不改
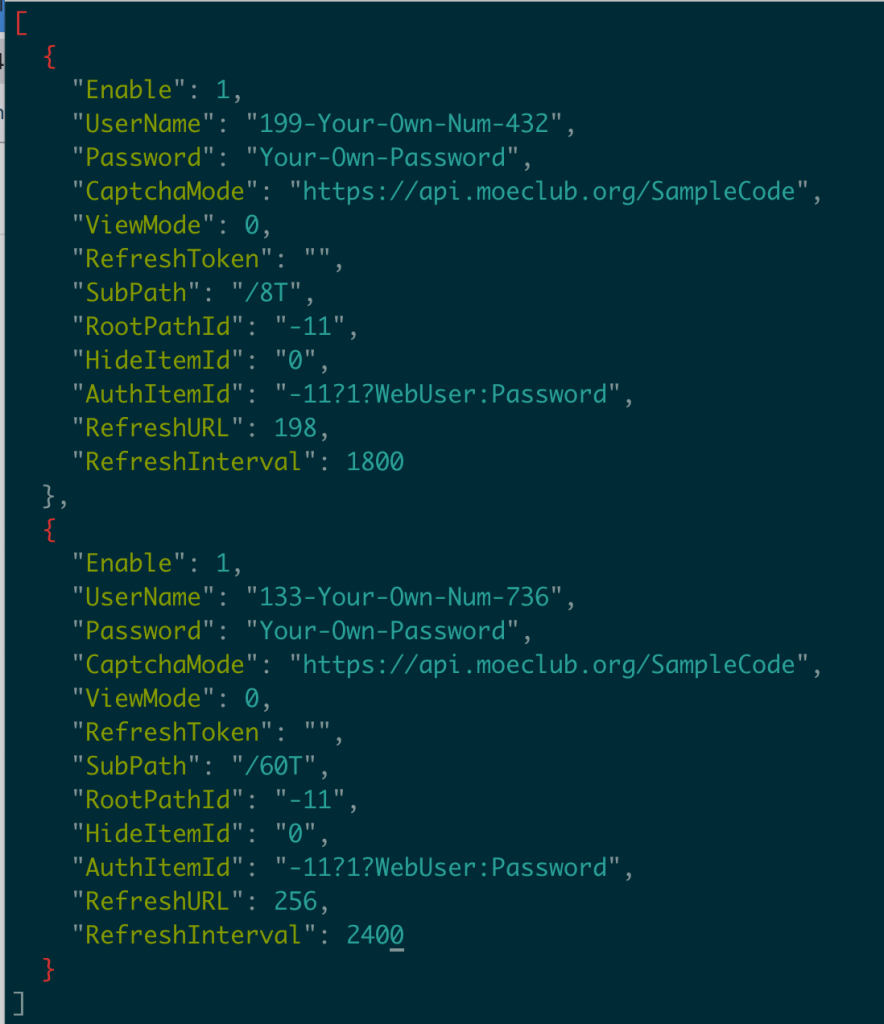
挂了两个盘的配置长这个样子
[
  {
    "Enable": 1,
    "UserName": "199-Your-Own-Num-432",
    "Password": "Your-Own-Password",
    "CaptchaMode": "https://api.moeclub.org/SampleCode",
    "ViewMode": 0,
    "RefreshToken": "",
    "SubPath": "/8T",
    "RootPathId": "-11",
    "HideItemId": "0",
    "AuthItemId": "-11?1?WebUser:Password",
    "RefreshURL": 198,
    "RefreshInterval": 1800
  },
  {
    "Enable": 1,
    "UserName": "133-Your-Own-Num-736",
    "Password": "Your-Own-Password",
    "CaptchaMode": "https://api.moeclub.org/SampleCode",
    "ViewMode": 0,
    "RefreshToken": "",
    "SubPath": "/60T",
    "RootPathId": "-11",
    "HideItemId": "0",
    "AuthItemId": "-11?1?WebUser:Password",
    "RefreshURL": 256,
    "RefreshInterval": 2400
  }
]

# 可以用 http://IP:8100 来直接访问(防火墙记得放行) -d 表示后台daemon运行
/root/CTList/CTList -a "95265-AuthCode-1e9e" -bind 0.0.0.0 -port 8100 -d

# 这个用于反代,无法外部直接访问;再开启SSL的话就可以https://ctl.xxx.com的方式来访问了
/root/CTList/CTList -a "95265-AuthCode-1e9e" -bind 127.0.0.1 -port 8100 -d
开启自启
cat > /etc/systemd/system/ctlist.service <<EOF
[Unit]
Description=CTList
After=network.target

[Service]
Type=simple
ExecStart=/root/CTList/CTList -a "9526-Auth-Code-1e9e" -bind 127.0.0.1 -port 8100
Restart=on-failure

[Install]
WantedBy=multi-user.target
EOF
systemctl daemon-reload
systemctl restart ctlist #重启CTList服务
systemctl enable ctlist #开机自启动CTList服务
systemctl start ctlist #启动CTList服务
systemctl stop ctlist #停止CTList服务
systemctl reload ctlist #重载CTList服务
systemctl disable ctlist #取消开机自启动CTList服务
systemctl status ctlist #常看CTList服务状态注意事项
- 多用于配置可以修改 vi config_multi.json
- Apply Token和用户名即手机号必填,且一个申请码只能绑定一个天翼云账号; 绑定多个账号需要在同样的授权码上绑定其它账号
- 目录下的README.md写得特号好,用之前好好读一下(https://github.com/iiiiiii1/CTList/blob/master/README.md)